
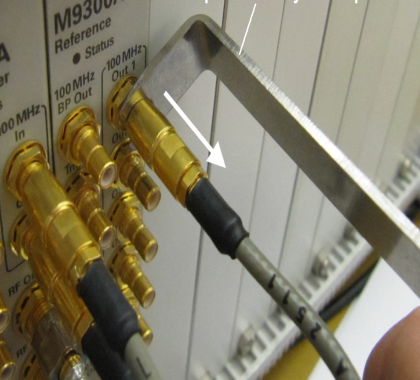
To avoid damage to the cables or connectors, pull the cable straight away from the connector. Do not use the tool as a pry bar.
This topic describes the preparation of the instruments used by the test software at a given test station. (Refer to Required Test Equipment to confirm that you have the proper test equipment.) The test software does not check instruments for proper operation on the GPIB bus or PXI before attempting to perform tests.
Use the Keysight SMB/MMCX cable removal tool (p/n 5002-3361) to disconnect SMB and MMCX cables from the module front-panel connectors.
|
|
To avoid damage to the cables or connectors, pull the cable straight away from the connector. Do not use the tool as a pry bar. |
Protection against ESD (electrostatic discharge) is essential while connecting, inspecting, or cleaning connectors attached to a static-sensitive circuit (such as those found in test sets). Static electricity can build up in your body and can easily damage sensitive internal circuit elements when discharged. Static discharges too small to be felt can cause permanent damage. Devices such as calibration components and other DUTs can also carry an electrostatic charge. To prevent damage to the test set, components and devices:
Always wear a grounded wrist strap having a 1 million Ohm resistor in series with it when handling components and devices or when making connections to the test set.
Always use a grounded antistatic mat in front of your test equipment.
Always wear a heel strap when working in an area with a conductive floor. If you are uncertain about the conductivity of your floor, wear a heel strap.
The typical GPIB address configuration for a test station is:
|
Spectrum Analyzer |
18 |
|
Power Meter |
13 |
Follow the steps below to manually check for proper connection of the GPIB devices before performing tests on a newly connected test station.
Note the GPIB address of each instrument associated with the test station/test plan defined earlier.
Connect a power cord to each instrument, and then connect each instrument to the computer serving as the GPIB controller.
Power up all the instruments on the GPIB bus.
Check each GPIB instrument for proper communication over the bus and the required "detectable" options. (A detectable option is one that can be detected through the GPIB.) Follow the process described below in Checking GPIB Bus Devices.
|
|
The following applies only to Keysight/Agilent/HP GPIB cards. A different program is used for National Instruments GPIB cards. |
Start the VISA Assistant:
Select the hp box or the IO box on the right side of the task bar or access it through: Start/Programs/Keysight IO Libraries/VISA Assistant.
Check for all expected GPIB devices:
Verify that all expected GPIB devices are shown
in the left window.
If a device is missing, correct the problem and restart the VISA
Assistant.
Check all GPIB device addresses:
Verify that no two GPIB addresses are the same.
Follow the process described in the user manual for the device if an address needs to be changed. The following numbers are reserved and are not available for GPIB addresses: 0, 1, 21, 31.
After changing the address of the device, go to the Administration area, highlight the device icon, and enter the correct GPIB address into the Address field.
Check for basic operation of each GPIB device:
|
|
If an instrument does not support SCPI, refer to the user guide for your product to learn more about checking the basic operation of its GPIB. |
Select a GPIB device to highlight it.
Select the Formatted I/O tab (expand the window if needed).
Select the SCPI radio button.
Select the *IDN? button.
Check to see that the expected model number is contained in the response text string.
Check for detectable options on a given device:
Select a GPIB device to highlight it.
Select the Formatted I/O tab.
Select the SCPI radio button.
Enter *OPT? and select viQueryf.

